By Wayne Burke
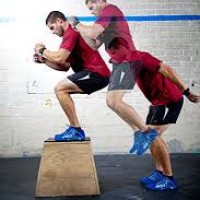
-November 25th, 2015- Last week I wrote a blog outlining the early phases of plyometric training. In that blog, I included a video showing an example of a phase 1 lateral hop. Below is an example of a phase 1 linear plyometric box jump. All the same principles apply to the jump as they do they hop. On the take off you want full extension of the ankle, knee and hip with a soft, controlled and quiet landing on the box, or in this case, the bench.
Remember to pick a box height that is suited to your ability. You should be able to jump up onto the box with minimum “knee tuck” to your chest and land in a stable athletic position, as shown in the video above.
Here is an example of a poorly executed box jump.
Notice the difference in jump height in each video. In the first video I extend my ankles, knees and hips to get “as tall” as I can when leaving the floor to produce as much force as possible. This is what we are trying to train in the early stages. In the second video, I simply bring my knee towards my chest to give the illusion of a high jump. If we were to measure the maximum height that my hand would reach in each jump and compare, the first video would prove to be significantly higher than the second.
Moral of the story, pick an appropriate height box and give a full maximum effort with each rep. Do not glorify your box jumps, your only sacrificing good training for poor practice.
Tags: change of direction, Conditioning, core stability, injury reduction, lacrosse training, lacrosse workouts, Power, speed, Speed Training, stability

Leave A Reply (No comments so far)
No comments yet